Learn how to use the Data Processing module in Campus
Important!
Using the Data Processing module in Campus does not make you automatically compliant. Instead, the module provides a number of tools that you can use to help with your compliance. You should always get advice from a legal professional who will give you the best compliance advice for your specific situation. Ultimately, it's up to you and your team to determine what compliance looks like to your business.
In this article
- What is the GDPR?
- Legal Processing Grounds
- Engagement Methods
- Sign Up Mechanisms
- Adding Sign Up Mechanisms to Forms
What is the GDPR?
We've written the industry-leading guide on the GDPR and how it affects marketing to schools. It's very detailed (27 pages long) and give you lots of actionable information, tips, and clarification to help you understand this law.
You can download a copy for free on our website here:
https://www.sprint-education.co.uk/education-marketing-academy
The EU’s General Data Protection Regulation (GDPR for short) is the result of several years’ work by the EU. It was adopted in April 2016 by all EU Member States (including the UK) and became enforceable law on 25th May 2018.
The EU created the GDPR for two main reasons.
Firstly, they wanted to bring the laws surrounding data protection in line with our modern world.
In the UK this is currently governed by a set of laws called the Data Protection Act (DPA for short) from back in the 90’s that was created before the emergence of cloud providers and internet giants like Google and Facebook. The GDPR was brought in to stop data being exploited, and strengthens and protects all of our rights.
Secondly, the EU wanted to simplify and standardise the approach to data protection across its member states.
This is so that businesses have a simpler and unified way of dealing with data.
Failure to comply with the GDPR can result in hefty fines, which can reach as high as €20 Million or 4% of global annual turnover, whichever is higher.
As mentioned above, the GDPR Data Processing features in Campus are designed to help you with your compliance. Simply using them will not automatically make you compliant.
Legal Processing Grounds
The GDPR states that there are six ways you can legally process personal data:
- Consent
- Contract
- Legal Obligation
- Vital Interest
- Public Interest
- Legitimate Interest
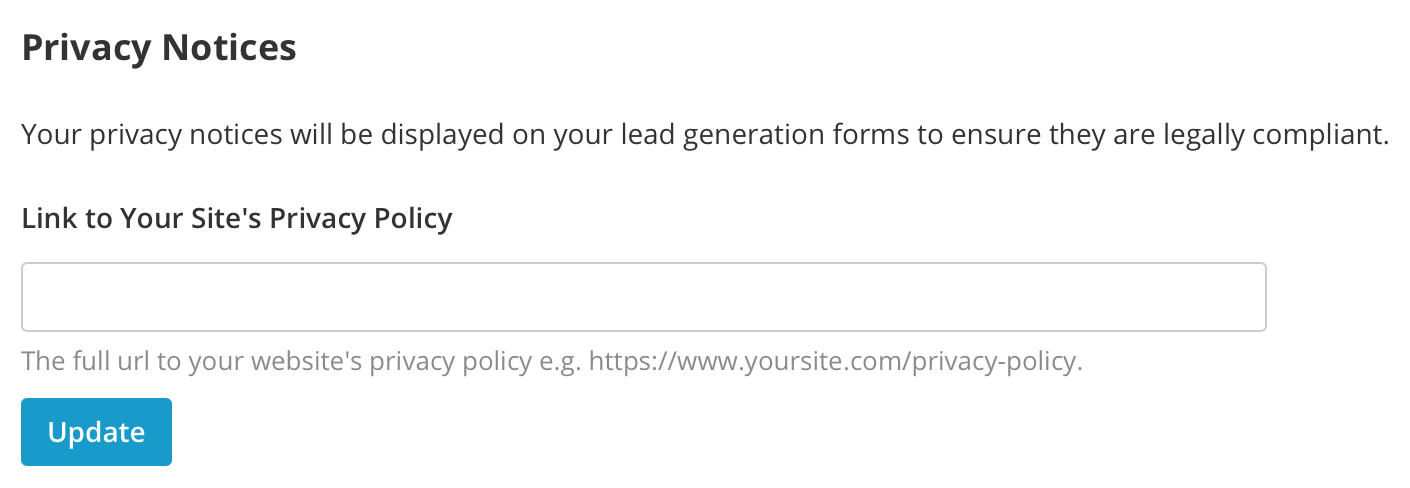
How you legally process your contacts' data should be detailed in your privacy policy (usually found on your website). Campus has a place for you to record a link to your privacy policy so that it can use it in the legal text associated with any lead generation forms you might create (more about that later).
To create a link to your privacy policy go to your Settings module (by clicking on the Settings item in the dropdown menu underneath the user picture top right of your screen). Then select the Data Processing item in the submenu and then the Legal Processing item in the dropdown. You'll then be fired over to the Privacy Notice page.

Simply fill in the full url of your website's privacy policy and click the Update button.
Essentially, for every contact you have in Campus, you should hold a legal ground for processing. In Campus you can assign a legal processing ground to each contact by assigning them an engagement method.
Engagement Methods
An engagement method is essentially an activity that your contact undertook which provides you with a legal processing ground. Each engagement method needs to have an associated legal processing ground.
For example, if the engagement method is 'Client emailed an enquiry' then the processing ground could be 'Legitimate Interest'. You'll need to decide what engagement methods your organisation uses and what legal processing ground is appropriate for that method.
Creating Your Engagement Methods
You can create your own engagement methods by clicking on the Engagement Methods under the Data Processing item in your Settings sub nav. You'll now see your Engagement Methods data grid.

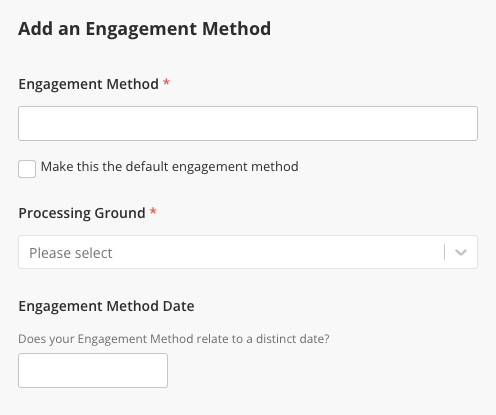
Now click on the Create Engagement Method button and a window will slide in.

Firstly add in your engagement method and then select your processing ground. You can also make it your Default engagement method which will save you some time when you're adding new contacts (more on that later).
Engagement Method Date
Finally, if your engagement method has a distinct date associated with it then add it in the Engagement Method Date field. You should only fill in this field if the engagement method took part on a certain date and that date alone. For example, 'Provided Business card at Jan 9th Education Conference'. When you come to add an engagement method to each of your contacts the engagement method date will be set as the day you're assigning the engagement method unless you have filled in this Engagement Method Date field, in which case it will use the date you've specified here.
Once you've created your engagement methods in your Settings module, you can go ahead and assign your contacts' engagement methods. This is a good thing to do for a couple of reasons:
1. It enables you to keep a record of how you came across that contact's data and how you process it legally. It acts as an audit log of your compliance. Once you've assigned a contact an engagement method you'll be able to see all the pertinent information over on the contact's view page.

2. You're able to create Contact lists based on their engagement method. So for example, if one of your engagement methods is 'Inbound call' you're able to go and build a list based on that criteria over in the Contacts module.

You're also able to create lists based on the legal processing ground too.

A Note About Lead Generation Forms
Your Lead Generation Forms are perfect examples of engagement methods. You don't need to manually create these. Once you've created your Lead Generation From over in the Forms module and one gets submitted by your audience then it will appear automatically in your engagement methods list.
How to Assign Engagement Methods to Your Contacts
Head on over to your contacts and edit one by hovering over the contact in the data grid and clicking the Edit button. The Edit Contact window will slide in.
Now scroll down to the Engagement Method field.

Select the engagement method you'd like to associate with the contact. N.B. Your default engagement method will be automatically selected.
Once you've selected your engagement method you'll be prompted to select the engagement method date. This will be set to today unless your engagement method was given a distinct date when you created it over in the Settings module.

Sign Up Mechanisms
Some of the most common engagement methods are your lead generation forms. Sign up mechanisms are the sections at the bottom of these forms that contain a link to your privacy policy, some text explaining the legal processing method you're relying on, and often, depending on the mechanism, a checkbox too.
Campus provides you with five common sign up mechanisms for you to choose from when creating your form. Adding in a sign up mechanism to your form is as simple as dragging it into the form builder. More on that a little later.
N.B. Any of your current forms that were built prior to January 2019 will continue to work without a sign up mechanism but if you create a new one or edit an existing one you will be required to include a sign up mechanism.
Each Sign Up Mechanism comes with some pre-written text which you can edit to suit your organisation's taste by selecting the Sign Up Mechanisms item in the submenu You'll then be fired over to the Sign Up Mechanisms page.
To view the text associated with each sign up mechanism simply click on the name and the page will slide down to reveal the information.

Here's a little more information on each of the five mechanisms.
1. Explicit Consent Unticked Checkbox
Examples of where this mechanism is used are for value assets, free trials, and newsletter sign up lead generation forms.

2. Explicit Consent Alternative Submit Text Link
Examples of where this mechanism is used are for value assets, free trials, and newsletter sign up lead generation forms.

3. Soft Consent Pre-ticked Checkbox
Examples of where this mechanism is used are quote requests, support requests, or any interaction that signifies a new, or existing, business relationship with the contact.

4. Legitimate Interest Pre-ticked Checkbox Section
You should use this mechanism only if you’re comfortable that you’re just gathering corporate subscriber data via your form. You do not need to gain consent from corporate subscribers, e.g. teachers, to process their data as long as you hold a valid ‘legitimate interest’.

5. Legitimate Interest Privacy Policy Link
You should use this mechanism only if you’re comfortable that you’re just gathering corporate subscriber data via your form. You do not need to gain consent from corporate subscribers, e.g. teachers, to process their data as long as you hold a valid ‘legitimate interest’.

Changing the Mechanism's Wording
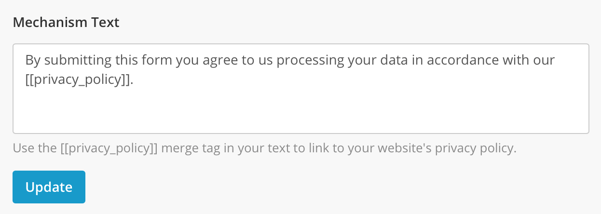
It's very straight forward to change the text of any of the five default sign up mechanisms. Simply click on the one you want to edit, make your changes, and click the Update button.

Adding a Sign Up Mechanism to a Form
Once you're happy with the wording of your sign up mechanisms head on over to the Forms module and click through to the Fields and Layout step. On the left hand side there's a panel titled Sign Up Mechanisms and within it are the five default ones that Campus provides you with, and an extra one called Other.

To use any of these in your form simply drag them over into the forms fields area on the right and they'll appear at the bottom.

Using the Other Sign Up Mechanism
If you'd rather create your own sign up mechanism that's fine. Simply drag the Other item into the form and a window will slide in for you to choose the Legal Processing Ground and the Sign Up Text. The only restriction is that you must include a link to your privacy policy in the text. That is done by using the [[privacy_policy]] merge tag.
